

How To Change Water Color In Photoshop
This step-by-pace tutorial volition show you lot how to make a photo look similar a watercolor in Photoshop. Nosotros will utilise a couple of filters, a Smart Mistiness, blending modes, a paper texture overlay, and some brushes to create the watercolor event in Photoshop.


What is a Watercolor?
Watercolor paintings are fabricated by mixing water-soluble paint with water. The textured paper absorbs the color as the water dries.
Watercolors are soft and luminous. The color is almost transparent, letting the texture of the paper show through. The colors bleed into each other on the edges. They also often have vivid, vibrant colors. The subject can go all the fashion to the border of the newspaper. Sometimes they seem to sally from the white groundwork.
The drips and smudges add together an ethereal quality. The paintings are dreamlike or otherworldly.

Gather Your Materials
Only like a watercolor artist, you will need some paper and brushes.
Download a digital paper texture. Unsplash has many gratis options. Search "watercolor paper" and cull the i you lot like.
I used a simple white textured paper past NordWood Themes. You can also utilize colored newspaper or paper with watercolor castor strokes. These will interact with the colors in your photo equally we change the blending modes.
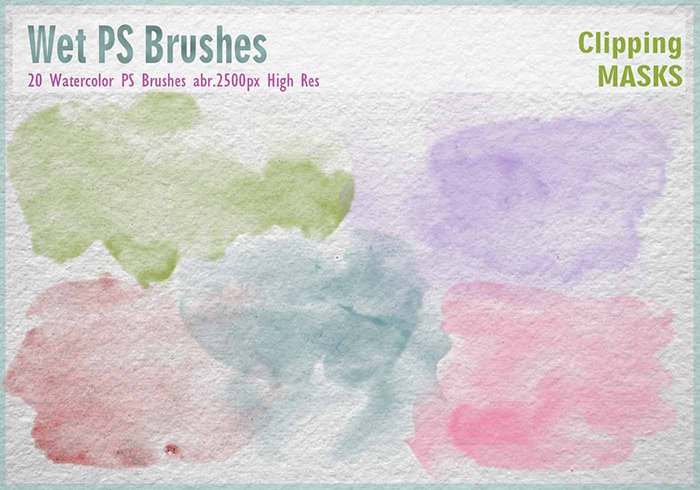
You likewise demand some watercolor brushes for Photoshop. There are many gratuitous options. Search for "watercolor brushes." I used Wet PS Brushes from Brusheezy. I will prove you lot how to load the brushes into Photoshop in a minute.
Don't you feel similar a watercolor painter! At present that we have all the materials we need let's jump into Photoshop.
How to Add a Watercolor Painting Effect
Follow forth to create a watercolor painting in Photoshop. There are a lot of small steps, but none of them are hard. Let's start by opening an image and installing the brushes.
Step i: Open Photo in Adobe Photoshop
Get-go past opening a photo in Photoshop. You lot tin send one from Lightroom or the File drop-downward menu. Select File > Open (Ctrl/Command+O). And then, navigate to the file.
Click Open.

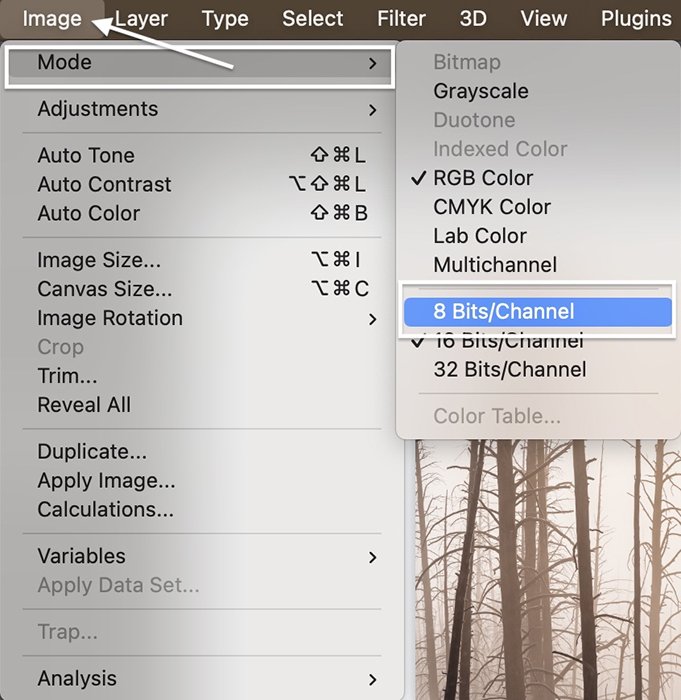
Pace ii: Alter Image Manner
To use the filter gallery later, you need to change your photograph to an 8-bit image. An 8-fleck file is smaller and has less color diverseness. Only that does non matter to the effect we are creating.
Go to the Paradigm drop-down bill of fare and select Image > Fashion > 8 Bits/Channel. Your file may already be 8-$.25.
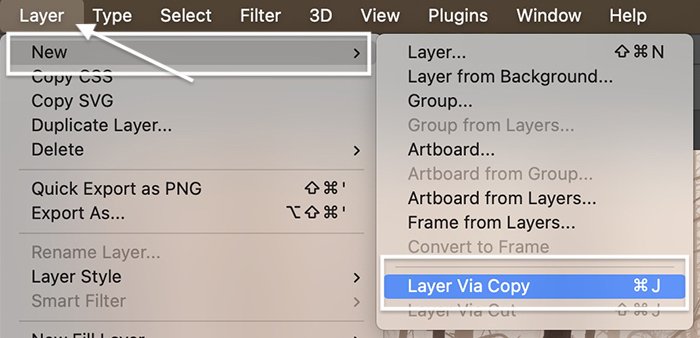
Step 3: Copy Background Layer
Go to the Layer driblet-down menu and select Layer > New > Layer via Re-create (Ctrl/Commnd+J). Rename this layer "Watercolor Upshot."
Then turn off the Background by clicking on the eye icon. We will add together the blur in a infinitesimal.
Step 4: Convert Layer to a Smart Object
Convert the Watercolor Effect layer to a smart object. This lets u.s. add furnishings like blur then get back and alter the upshot later on.
Get to the Layer drib-downward menu and cull Layer > Smart Objects > Convert to Smart Object.

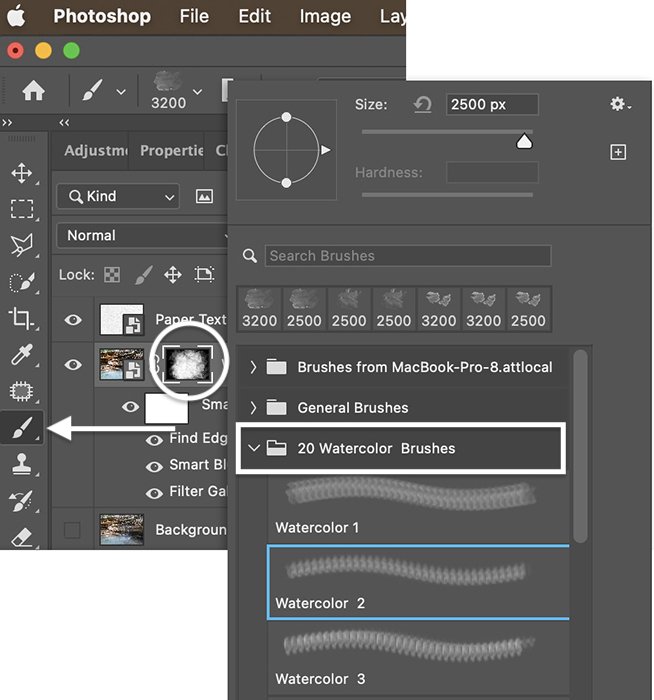
Footstep 5: Install Brushes
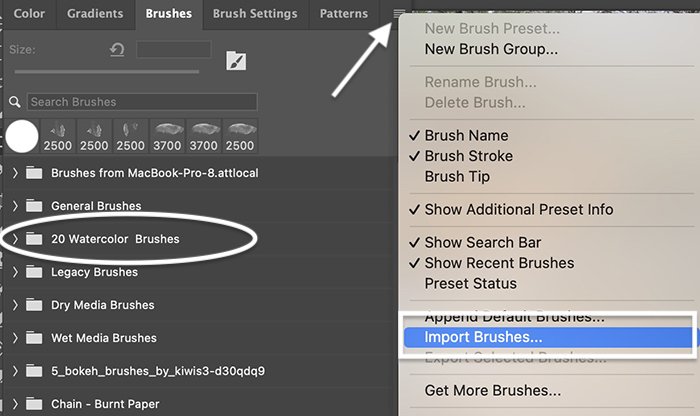
Next, import the brushes. If the brushes you downloaded are in a Nothing file, double-click it to expand the folder.
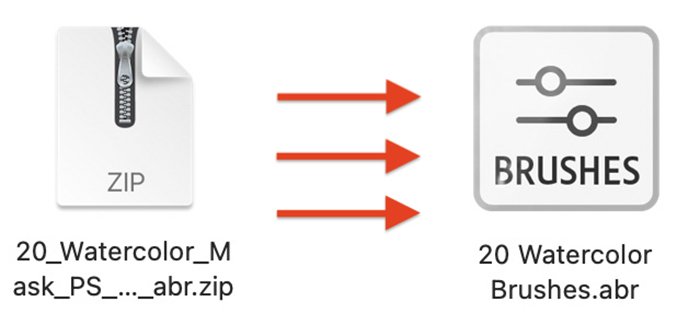
Get to the Window driblet-down menu and select Window > Brushes. Click the 3-line icon in the top right corner of the brush panel. Select "Import Brushes" from the card.
Navigate to the brush file you lot downloaded. Our example icon says, "Brushes." Click Open.
In the list of brushes, there should now exist a folder labeled with the name of your watercolor castor collection (i.eastward., "20 Watercolor Brushes"). We will use these towards the end of the tutorial.
Pace half-dozen: Add Watercolor Effects to the Photograph
Watercolor paintings have a soft mistiness. We volition use a couple of Photoshop filters to get the effect.
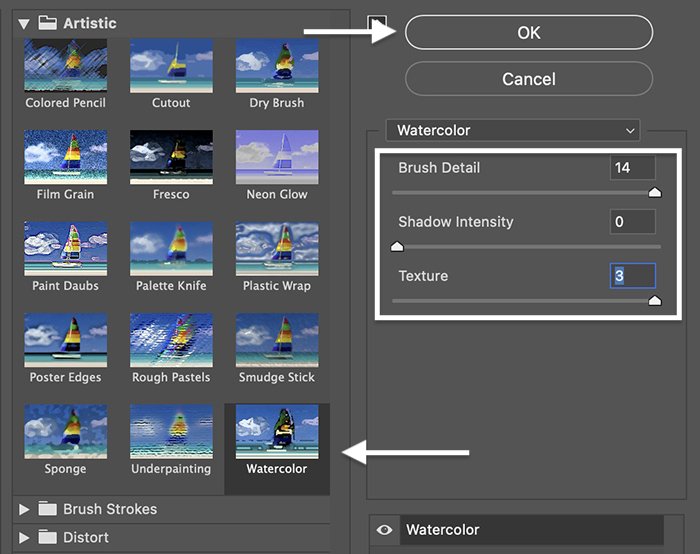
Get to the Filter drib-downwards menu and select Filter > Filter Gallery. If this option is greyed out, make sure you lot converted the file to eight-scrap way.
Open the Creative menu. We will utilise two of the filters.
First, click the Watercolor upshot. (You could too utilise the Dry Brush filter.) Set Brush Detail to xiv, Shadow Detail to 0, and Texture to 3. Then click the plus icon at the bottom of the window.
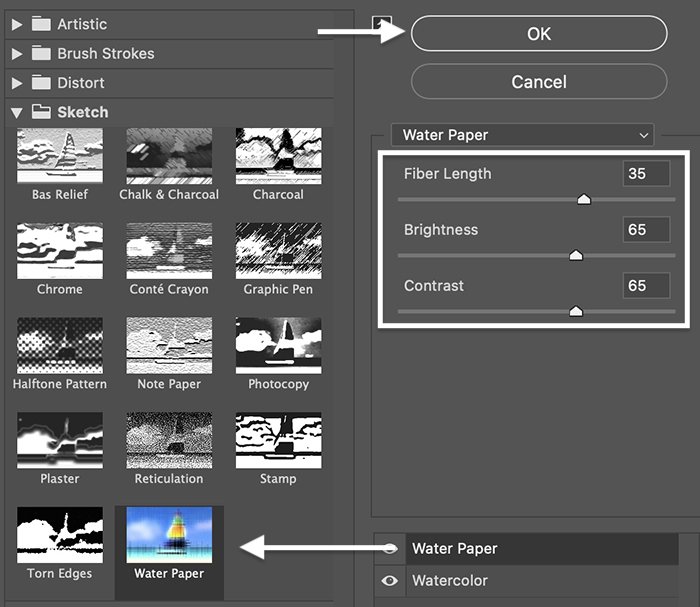
Then, open the Sketch menu. Set the Fiber Length to 35, the Brightness to 65, and the Contrast to 65. Feel free to experiment with these settings.
Click OK.
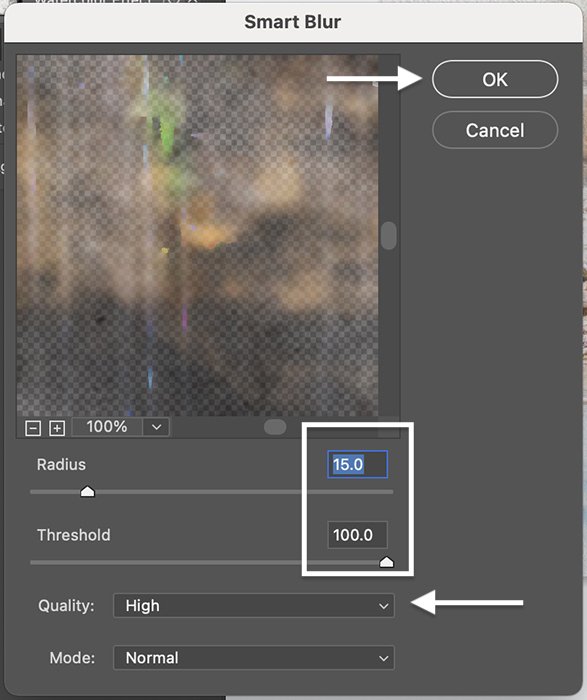
Footstep vii: Add a Smart Blur
With the Watercolor Issue layer selected, click the Filter menu again. Select Filter > Blur > Smart Mistiness. Movement the Radius slider to xv and the Threshold slider to 100. Alter Quality to High.
Click OK.
Pace 8: Add together Sketched Edges
The last filter to add together is Find Edges. This makes it look like yous sketched the picture before painting. Go to the Filter drop-downwards menu. Cull Filter > Stylize > Find Edges.
You should have 3 Smart Filters in the layers panel—Detect Edges, Smart Blur, and Filter Gallery.
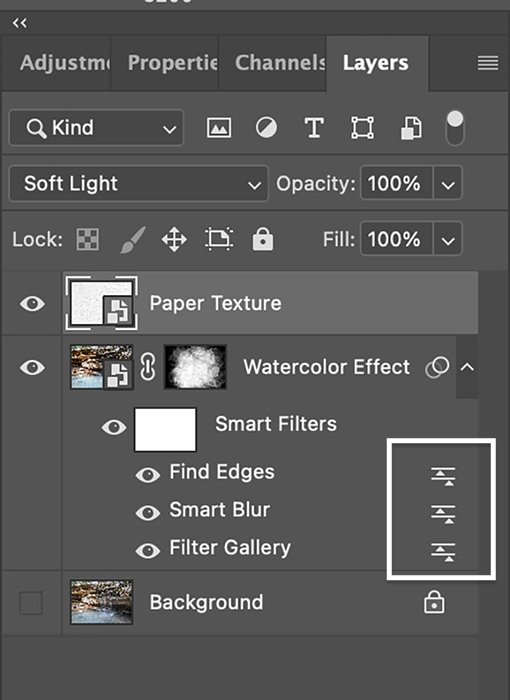
Footstep 9: Change Blend Modes
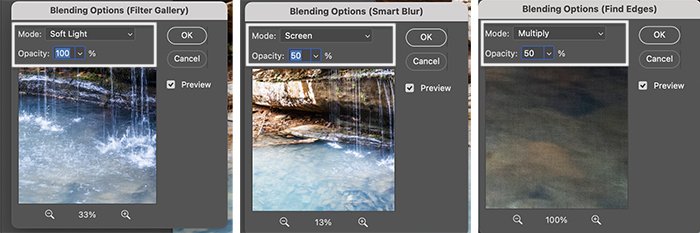
We will blend each Smart Filter a little differently using blending modes. Permit's start with the Filter Gallery. Double-click on the icon to the right of the proper noun. Change the blending manner to Soft Light.
Click OK.
Double click on the icon to the right of Smart Mistiness. Cull Screen blend mode and gear up the Opacity to 50%.
Click OK.
Finally, double-click the icon to the right of Notice Edges. Change the mode to Multiply and the Opacity to fifty%.
Click OK.
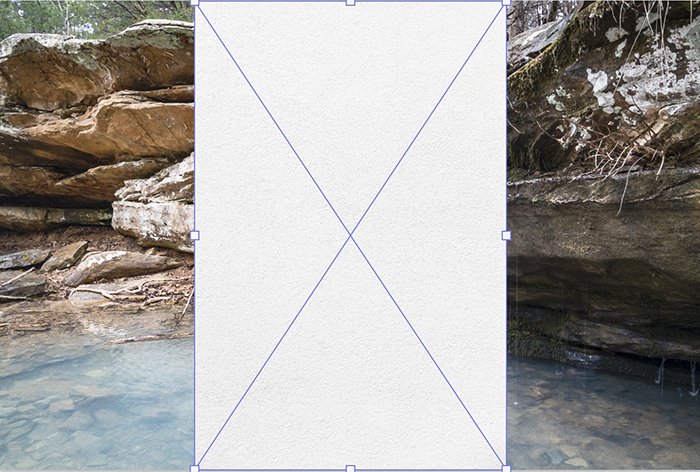
Step 10: Add together Paper Texture
To add the paper texture you downloaded earlier, go to the File drop-down menu. Choose File > Place Embedded. Navigate to the file.
Size the texture layer until information technology covers the entire photo. Modify the blending mode to Multiply. If yous chose colored paper, another blending fashion like Soft Light might expect improve.
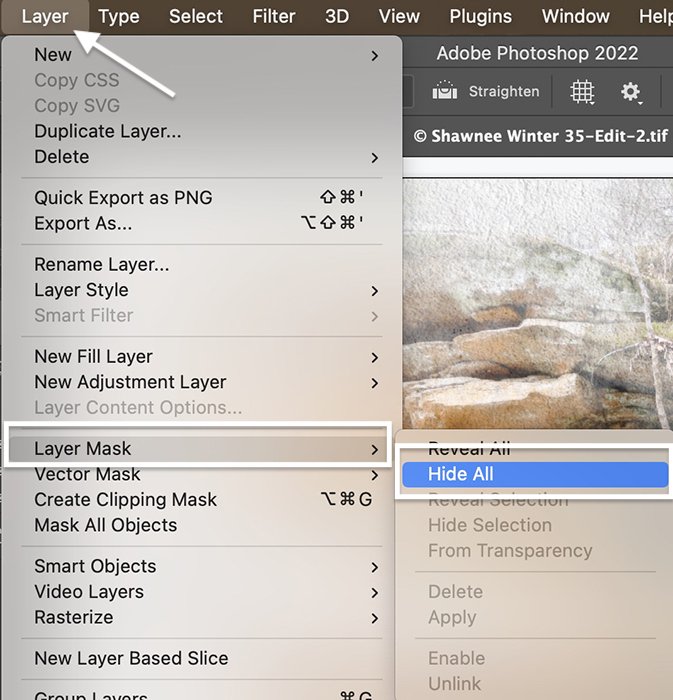
Footstep 11: Add a Layer Mask
Go dorsum to the Watercolor Consequence layer and add a layer mask. Go to the Layer drop-downwards menu. Choose Layer > Layer Mask > Hide All.
Step 12: Paint!
Select the layer mask and the castor tool. Prepare your foreground color to white.
Paint using 1 of the brushes that you downloaded earlier. Set Opacity and Flow to 100% in the Options toolbar.
Pigment a little at a time and use more than one castor at more than 1 size. The watercolor picture gradually appears.
Conclusions
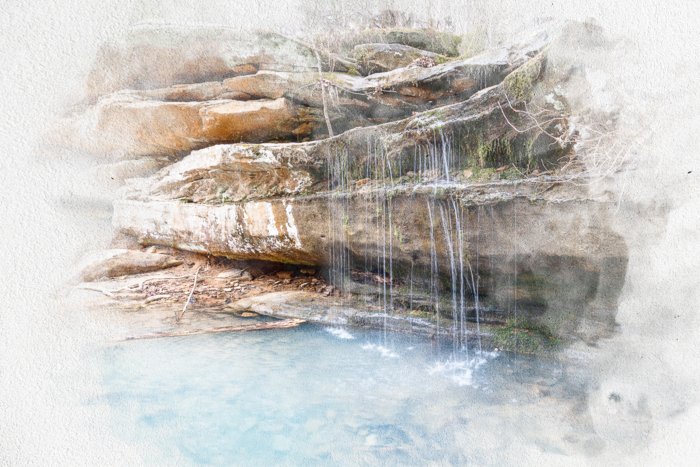
This tutorial showed you how to create a watercolor outcome in Photoshop. We used a few filters, a texture overlay, and brushes. Some of the tools may have been new to you, but each step is easy… and there is room to experiment—especially when painting with watercolor paintbrushes. Be creative and enjoy!
Try out our Digital Dreamworlds e-book to learn more virtually blend modes and create stunning photo collages!
Source: https://expertphotography.com/watercolor-effect-photoshop/
Posted by: johnstonencted.blogspot.com
0 Response to "How To Change Water Color In Photoshop"
Post a Comment